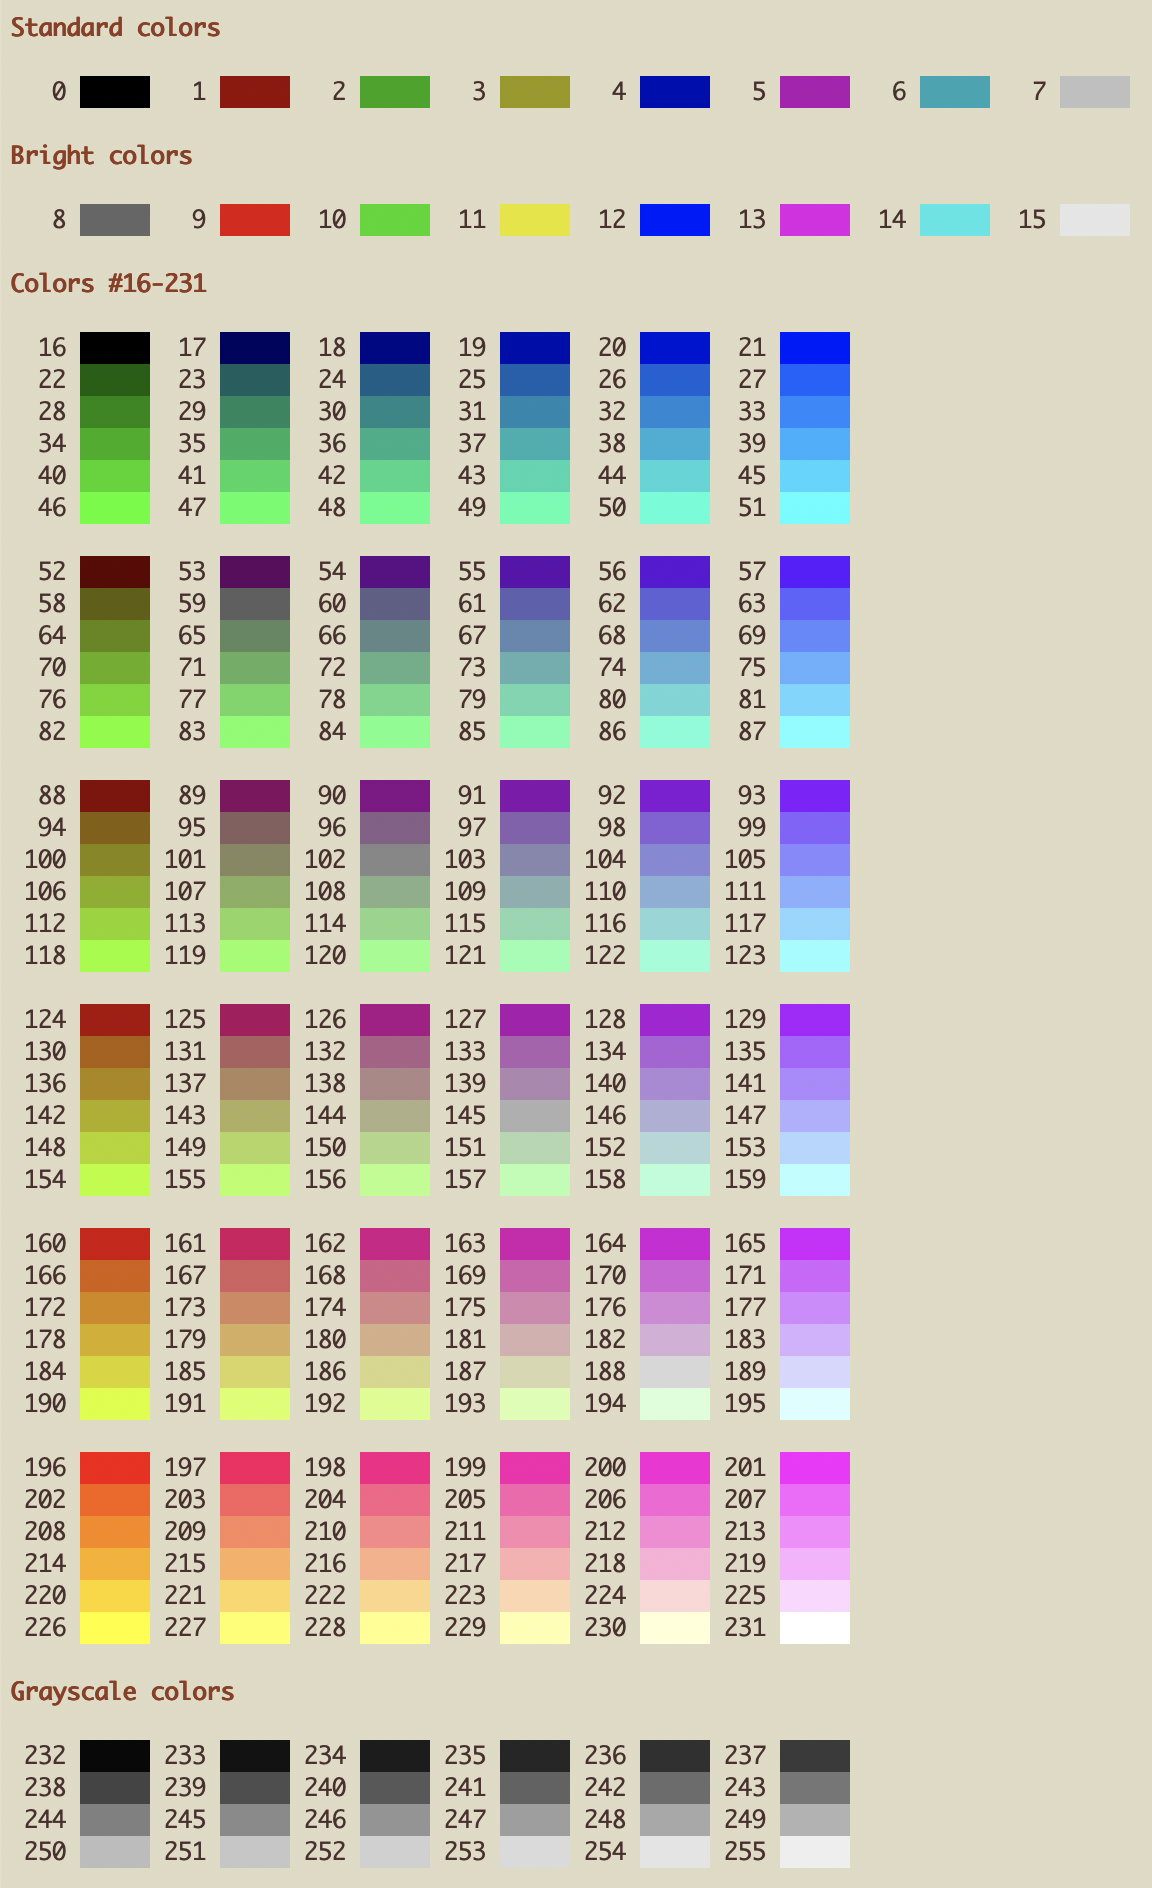
If you’ve ever worked with colors in a modern terminal emulator you may occasionally find yourself looking for just the right index to use in its standard 256-color palette. The other day I was in the same situation, so I wrote a little Bash script to print a pretty preview of all the colors. Here’s some sample output from Terminal.app (using the “Novel” profile):
Not bad! Now you could just download the script and call it a day, but what’s the fun in that? 😊 If you’re game, let’s take a few minutes to go through the code together and figure out how it works…
First, we write a function to print each color index:
On line 7, we create a new string (padding) of three whitespace characters. On line 10, we set the variable index equal to the first parameter ($1). Finally, on line 11, we print the index padded to a width of five characters. The result is right-justified, with a single space to the right of each index.
The syntax for the padding is a bit obtuse, so let’s break it down:
${variable} is a more explicit way of writing $variable, and simply returns the value of the given variable.
${variable:offset} returns the value (substring) of the given variable starting from the specified offset.
So ${padding:${#index}} returns a string with the number of whitespace characters in padding less the number of digits in index. More specifically, this expression returns two whitespace characters if index has one digit; one whitespace character if index has two digits; and an empty string if index has three digits.
(For more details on this syntax, see the section on parameter substitution in the Advanced Bash-Scripting Guide.)
5 indicates that we are using a 256-color lookup table.
Similarly, on line 15, \e[0;39;49m is an SGR control sequence that resets all display attributes (0) before setting the default foreground (39) and background (49) colors.
(Note that the numbers in an SGR sequence are separated by semicolons and that a valid sequence must end in the ASCII character m.)
On line 19, we bring this all together to display a color patch. Building on the explanation above, we can describe what the expression ${lut}${index}m ${padding} ${reset} does as follows:
${lut}${index}m expands to \e[48;5;${index}m, selecting the color at the given index from a 256-color lookup table.
␣${padding}␣ expands to five whitespace characters (the width of the color patch).
${reset} expands to \e[0;39;49m, resetting all display attributes along with the foreground and background colors.
Now that we have our plumbing in place, let’s print the eight standard colors (indices 0–7) on a single line:
216 colors won’t really fit on a single line, so we’ll take the fact that they are arranged in a 6x6x6 “cube” into consideration and print them in 6x6 blocks, instead. We iterate through the indices six at a time (line 47), adding an extra space before each 6x6 block (line 48) and printing each index followed by a patch of its corresponding color (lines 50–53).
Finally, let’s print the 24 grayscale colors (indices 232–255):
Once again, 24 colors won’t really fit on a single line, so we iterate through the indices six at a time (line 61), printing each index followed by a patch of its corresponding color (lines 62–65).
And that’s it! I hope you found this post to be helpful and/or edifying. Once again, you can download a copy of the script to use and modify as you see fit. Have a question or comment? Feel free to get in touch on Twitter or by email.
I recently wanted to allow larger files to be uploaded to my private Discourse site (running v1.2.0.beta1). It was easy enough to find the option that I needed to update—max attachment size kb—but I didn’t know what to make of the following warning:
The maximum attachment files upload size in kB. This must be configured in nginx (client_max_body_size) / apache or proxy as well.
I just created a Gist to serve as a personal reminder of all the video games that I have played before as well as the ones that I would like to play some day. I chose to publish this list as a Gist so that you are free to fork it and even suggest new additions, if you’d like.
I admit that the phrase “short list” may seem like a bit of a misnomer—the list is long and will only get longer—but this still only scratches the surface of the vast universe of games out there. Say what you will, but I think that we are truly in a golden age of gaming.
I wanted to host a second website on my Linode recently. Rather than look up the process for doing so again when/if I decide to host a third website on the same Linode, I realized that I should just write up my own quick start guide for future reference. I am posting it here on my blog because I assume that it will be useful to someone else, too. (When in doubt, make it public.)
Note that although I am explicitly writing about how to add a website to a Linode running Ubuntu, you should be able to use most of these instructions on any Ubuntu server. In fact, I’m not even going to explain how to use Linode’s control panel here—I will only provide command-line instructions.
When I first read that Japanese government officials had denounced the Tokyo Electric Power Company (TEPCO) by drawing an analogy between its Fukushima cleanup efforts and a game of whack-a-mole, I have to admit that I initially enjoyed a bit of schadenfreude at TEPCO’s expense. It’s refreshing to see a company that has caused so much disruption to Japanese families finally get some kind of comeuppance—even if only in the form of a mild verbal lashing.
Once I got over my knee-jerk reaction, however, it gradually dawned on me that this is actually quite a boon for TEPCO. Bad press over the utility’s incompetence doesn’t change the fact that TEPCO’s plants power a third of Japan. Consumers are stuck with TEPCO whether they like it or not. We may laugh at the analogy between TEPCO and children playing whack-a-mole, but I imagine that the TEPCO executives are laughing too—all the way to the bank. In fact, they must be overjoyed that the government has decided to step in and take over the cleanup efforts, because this means that the financial burden of cleanup has been shifted from TEPCO to the Japanese taxpayer (in much the same way as the losses sustained by the U.S. financial system in 2007 were ultimately borne by the U.S. taxpayer). Furthermore, any failures in the cleanup effort will now be blamed on the Japanese government instead of TEPCO.
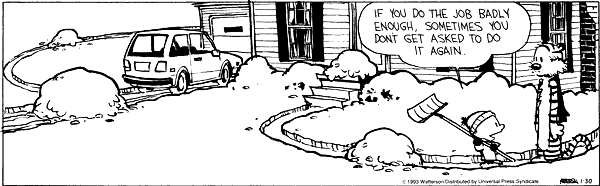
I can’t help but think of the following Calvin and Hobbes comic.
“If you do the job badly enough, sometimes you don’t get asked to do it again.”
I’ve always felt that Git’s default diff output left something to be desired, especially when it was applied to Markdown text files (like the ones used to generate this blog). Line-by-line diffs aren’t very helpful if every line represents a paragraph of text.
I was thus pleasantly surprised to stumble across this blog post, which—among other things—explains how to generate word-by-word diffs that wrap nicely. The first step is to configure the default Git pager to wrap lines using one of the following commands.
The second step is to tell Git to generate a (colored!) word-by-word diff with the --color-words option.
git diff --color-words
And that’s all there is to it! Note that --color-words is technically equivalent to --word-diff=color, so if you’re interested in reading about the other available options to --word-diff you can check out the git-diff man page.
As helpful as this technique is, there is one caveat to keep in mind: as far as I can tell the --color-words option only works with the git-diff and git-log commands. If you happen to use git add -p to stage individual changes—like I do—you are stuck with the default line-by-line diff output of git-add. That’s really only a minor inconvenience, though, because you can still call git diff --color-words just before git add -p to get a nicely-formatted overview of your changes before you stage them.
I hope you found this tip to be as helpful as I did!
I don’t know what to think of the Nintendo 2DS. First of all, it has a clever yet strange name: as an overlapping combination of “2D” and “DS” (“dual screen”), it pretty much describes a system in the original Nintendo DS series rather than one in the Nintendo 3DS family (as the Nintendo 2DS is officially being marketed). I wonder if this is a sign that Nintendo is preparing to replace their existing Nintendo DS lineup—the Nintendo DSi and Nintendo DSi XL—with the Nintendo 2DS? That would seem to make more sense than simply releasing a new version of the Nintendo 3DS at a lower price point. After all, at $129.99 the Nintendo 2DS is only $40 cheaper than the Nintendo 3DS ($169.99).
Then again, if the Nintendo 2DS is indeed going to be the spiritual successor to the Nintendo DSi, why will the system be conspicuously absent in Japan? (As far as I can tell, the Nintendo 2DS has only been announced for sale in the Americas and Europe.) The reasons behind this decision are still mysterious to me, but if I were to hazard a guess it would be that the Nintendo 2DS appeals to the price-conscious sensibilities of Americans (and apparently Europeans) rather than the quality-conscious sensibilities of Japanese people. Furthermore, Nintendo’s brand awareness is very strong in Japan and thus the company may not need to constantly reduce prices in order to sell its products. Still, I wonder whether the $40 price difference between the Nintendo 2DS and the Nintendo 3DS is really significant enough to drive sales.
So all that being said, how does the Nintendo 2DS really stack up against its Nintendo 3DS brethren?
Although the process by which Git calculates SHA-1 hashes is well documented in Pro Git, I had a hard time finding it today and decided to write a blog post that will (hopefully) be a bit easier for myself and others to search for later.
First of all, use the hash-object command as follows to print the SHA-1 hash that Git calculates for an object. (You can also pass a filename as an argument to hash-object.)
Note that, by default, echo prints a trailing newline character so this command is actually computing the SHA-1 hash of "test content\n". Interestingly enough, though, if you try to reproduce this behavior in Ruby by computing the SHA-1 hash of the same string, you get a different result.
The reason for this, as explained in Pro Git, is that Git actually prepends the following information to a file’s contents before it calculates a hash.
The object’s type—blob for a regular object, tree for a tree object, and commit for a commit object
A space
The (human-readable) number of bytes of data in the object
A null byte (\0)
In other words, you need to run the following command to generate the appropriate hash.
A few months ago I shared a link to a successful Git branching model, also known as git-flow. I’ve always considered it to be a very robust and well-designed process for teams that collaborate via Git, but at the same time I’ve rarely used it for any of my personal projects. Why? I honestly never gave it too much thought, but after reading Scott Chacon’s take on the matter (GitHub Flow) I am inclined to agree with him. The git-flow process is just complex enough to outweigh the benefits for many developers.
One of the bigger issues for me is that it’s more complicated than I think most developers and development teams actually require. It’s complicated enough that a big helper script was developed to help enforce the flow. Though this is cool, the issue is that it cannot be enforced in a Git GUI, only on the command line, so the only people who have to learn the complex workflow really well, because they have to do all the steps manually, are the same people who aren’t comfortable with the system enough to use it from the command line. This can be a huge problem.
So the complexity of git-flow is one issue, and another is the frequency with which GitHub releases code (emphasis mine).
So, why don’t we use git-flow at GitHub? Well, the main issue is that we deploy all the time. The git-flow process is designed largely around the “release”. We don’t really have “releases” because we deploy to production every day – often several times a day. We can do so through our chat room robot, which is the same place our CI results are displayed. We try to make the process of testing and shipping as simple as possible so that every employee feels comfortable doing it.
This makes sense—git-flow does appear to be designed for more traditional release schedules rather than for continuous delivery, as summarized below.
For teams that have to do formal releases on a longer term interval (a few weeks to a few months between releases), and be able to do hot-fixes and maintenance branches and other things that arise from shipping so infrequently, git-flow makes sense and I would highly advocate it’s use.
For teams that have set up a culture of shipping, who push to production every day, who are constantly testing and deploying, I would advocate picking something simpler like GitHub Flow.
I highly recommend that you read the full article. If you’re still interested in learning more about Git, I would also recommend Scott Chacon’s comprehensive book on the subject, Pro Git.
Polygon does some excellent long-form journalism on the gaming industry, and this article is no exception. If you have any interest in indie games—as I do!—I hope that you will enjoy this report on the making of the Indie Megabooth at PAX East 2013.